
MOTORCYCLE SUSPENSION TUNING GUIDE
Number 1… The all important Sag measurement !
Click here to view SAG video https://www.youtube.com/watch?v=ZXCOoy9T0vc
Why create a sag video when you can see it on youtube by Rocky Mountain, Good job guys!
Sag percent rule of thumb:
Rear Suspension Sag Guidelines Chart:
Note: Always refer to your owners manual for your specific bike the table listed below is a rule of thumb starting point…. again your bike manufacture may have a different specification !!!
SAG TERMS
SAG : The original meaning behind the acronym SAG “Support And Gear”
Extended SAG refers to the measurement of suspension at full extension i.e. wheel off the ground / no weight compressing the suspension.
Static SAG refers to the amount the vehicle settles with no rider. This settling is about 6% – 10% of the total suspension travel.
Race SAG is the amount the bike droops with the rider on the bike. Rear suspension SAG is approximately 30% – 33%, the front SAG is around 25% – 30% of the total suspension travel.
TUNING FOR TRACK CONDITIONS
Before You Adjust Your Suspension Clickers double check the following
You should have a note book to keep track of your all your testing.
- Check where your clickers are set and take note.
- Adjust tire pressure for your type of riding and terrain.
- Make sure you have the correct spring rate on your bike and set your sag.
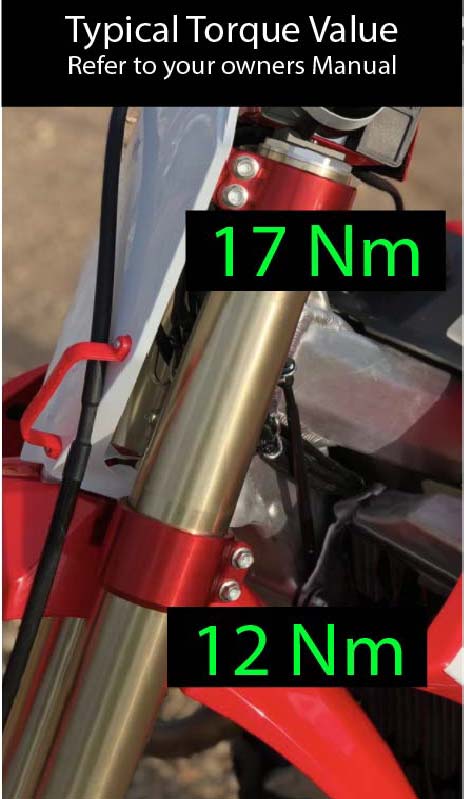
- Make sure the front wheel is Installed correctly. “Torque your triple clamps to the factory suggested specification. If triple clamp bolts are too tight the inner fork tubes can bind”. Typical torque for MX triple clamps bolts is 12Nm (106 inch/lb) for lower bolts and 17Nm 150 inch/lb) for the upper bolts ( refer to your owners manual when possible).
- Release the air out of the fork every time you ride using the air bleed screw or the aftermarket air release buttons. Also check your air spring pressure often. NOTE: even WP AER suspension forks have air release screws that require air release often.
- Maintain your suspension and your bike. Follow guide lines in your owners manual for suspension service intervals.
How to Adjust Suspension Clickers for Optimal Performance
Suspension clickers give you precise control over how your bike handles different terrain, rider weight, and riding style. Learning how to properly adjust your compression and rebound damping will improve your bike’s stability, traction, and rider confidence.
Step 1: Start With the Manufacturer’s Recommended Settings
Before tuning, refer to your owner’s manual for your fork and shock. Most bikes come with baseline clicker settings that offer a solid starting point.
-
Set your rebound and compression clickers to the standard factory positions.
-
Ride a familiar trail or track at moderate pace to feel how your bike behaves in stock trim.
Step 2: Understand the Function of Clickers
Your bike’s suspension includes two key components:
-
Fork (Front Suspension): May be inverted (USD) or conventional, depending on your model.
-
Shock (Rear Suspension): Found on most dirt bikes and full-suspension mountain bikes.
Both fork and shock typically include:
-
Rebound Damping Adjusters: Control how quickly the suspension returns after compression.
-
Compression Damping Adjusters: Control how the suspension absorbs impacts.
Many high-performance shocks also feature:
-
Low-Speed Compression Adjusters: Tune damping for slow shock movements (e.g., rolling bumps, jump faces).
-
High-Speed Compression Adjusters: Adjust damping during high-velocity impacts (e.g., square-edged bumps, jump landings).
Step 3: Experiment to Learn What Adjustments Feel Like
(Bracketing The Clickers)
Compression Damping Test:
-
Set fork compression adjuster to full firm.
-
Ride a short, safe loop (no race pace).
-
Set to full soft and repeat the same loop.
-
Observe the difference in fork response.
Repeat the same process with the rear shock compression clicker.
Rebound Damping Test:
-
Set fork rebound adjuster to full slow (fully in).
-
Ride the same loop and observe rebound behavior.
-
Set it to full fast (fully out), and compare.
-
Repeat with the rear shock.
Doing these tests gives you a real-world feel for the suspension’s full damping range. This helps you understand how each adjuster affects performance.
🔧 CLICKER TIP: Make changes in small increments—typically 2 clicks at a time—and test after each adjustment.
Step 4: Tune for Terrain, Weight, and Conditions
Soft Terrain (Sand, Loam, Deep Dirt):
-
Increase compression damping to control big, spaced-out bumps.
-
Increase rebound damping to reduce kick and maintain control.
Hardpack Terrain (Dry, Slick, or Rocky):
-
Use softer compression settings to improve traction and comfort.
-
Faster rebound can help the suspension recover more quickly over tight, choppy bumps.
Muddy or Wet Conditions:
-
Mud adds extra weight to the bike.
-
Increase spring rate (if possible) and add compression damping to compensate—this is a factory-supported technique used in pro level racing.
Step 5: Personalize Based on Rider Feedback
Clicker adjustments should reflect:
-
Rider weight and gear
-
Preferred comfort level
-
Speed and skill level
-
Type of riding (trail, MX, enduro, racing)
Final Thoughts: Why We’re Called Click Suspension
Clickers are the gateway to unlocking your bike’s true suspension potential. That’s why we’re called Click Suspension—because it all starts with understanding your clicker adjustments.
Proper suspension tuning transforms your bike’s performance and helps you ride faster, safer, and with more confidence.
Common Suspension Issues and How to Fix Them
Head Shake (Handlebar Oscillation)
Symptoms: Violent side-to-side movement of handlebars at speed—often described as the bars trying to rip out of your hands.
Common Causes & Fixes:
-
Loose Steering Head Bearings
Lift the front wheel and let the handlebars fall to one side. If they slam and bounce, your bearings are too loose. Adjust so the bars fall smoothly without bouncing. Tighten using the spanner nut, loosening the lower triple clamp to avoid altering fork height. -
Unbalanced Suspension Setup
-
Head shake during acceleration: Fork rebound may be too slow or compression too stiff.
-
Head shake during braking: Forks may be diving too much, causing the geometry to steepen. Adjust fork oil height or compression damping.
-
-
Rear Suspension Too Low
If your shock sag is too high it shifts weight to the front end, destabilizing the chassis. Lower the rear sag by decreasing rear spring pre-load.
Steering Problems
Oversteer
Bike turns more than expected.
-
Increase fork compression damping
-
Add rear sag or more preload
-
Try stiffer fork springs
Understeer
Bike resists turning.
-
Decrease fork compression
-
Reduce fork spring preload
-
Decrease rear sag
Fork Dive Under Braking
Forks compress too quickly under heavy braking.
-
Add fork compression damping
-
Increase preload or use stiffer fork springs
-
Raise the front end (lower fork legs in triple clamps)
-
Decrease rear sag to reduce forward weight transfer
Rear Shock Kicking Under Braking
Symptoms: Rear shock lifts or kicks when braking hard.
Step-by-Step Diagnosis:
-
Check Rear Sag First
If rear sag is too little, the bike rides high in back and dives up front. Lower the rear by reducing preload or using a softer spring. -
Check Fork Settings
Soft forks can dive under braking, causing rear-end kick. Try increasing fork compression or reducing rebound damping. -
Shock Rebound Damping
If rebound is too slow, the shock “packs” and starts kicking after multiple bumps. Adjust rebound in small increments and test. -
High-Speed Compression Damping
If shock kicks over square-edge bumps, soften high-speed compression 1/8–¼ turn at a time. -
Low-Speed Compression
If the shock feels harsh over rolling bumps, soften low-speed compression 1–2 clicks. -
Rider Position
Ensure you’re shifting your weight rearward under braking. Even perfect suspension can’t overcome poor rider balance.
Tuning for Specific Terrain Types
Hardpack / Square-Edge Bumps
-
Use softer compression settings for bump compliance
-
Maintain enough damping to avoid bottoming on jumps
Loamy Terrain
-
Increase compression slightly for improved jump support and bottoming resistance
Sandy Conditions
-
Go 2 clicks firmer on fork compression and shock rebound
-
Aim to ride on top of the terrain
Rocky / Rooted Trails
-
Soften compression for plushness and comfort
-
Speed up rebound to help tires recover from rock to rock
-
Best for trail/woods riding, not aggressive motocross
Troubleshooting Common Suspension Symptoms
| Symptom | Possible Causes | Fixes |
|---|---|---|
| Poor front-end traction in corners | Fork spring too stiff, compression too firm | Soften compression or reduce air pressure |
| Frequent bottoming out | Spring rate too low or not enough compression | Increase damping, stiffer springs, or fork oil level |
| Excessive sag or soft feeling | Preload or spring rate too low | Add preload or air pressure |
| Harsh on small bumps but uses full travel | Preload too high, too much compression | Soften compression, lower preload |
| Harshness over bumps after first few | Rebound too slow | Reduce rebound damping |
| Suspension feels overly stiff | Compression too high | Decrease compression click-by-click |
| Front-end chatter on braking | Spring preload too high or topping out | Reduce preload, soften compression |
| Fork rebounds too quickly | Not enough rebound | Increase rebound damping |
| Not using full fork travel | Stiff springs or too much preload | Soften springs, reduce preload, or lower compression |
| Rear shock bottoms easily | Not enough compression | Increase compression gradually |
| Rear shock feels harsh | Compression too high or wrong spring rate | Soften compression, verify spring rate |
Bonus Tip: Fork Oil Height Tuning
Changing the oil height in your fork’s spring chamber adjusts the mid-to-end stroke firmness.
-
Add oil for more progressive/stiffer feel (helps resist bottoming)
-
Remove oil to make the fork more plush mid-stroke
This “air spring” effect follows Boyle’s Law: reducing volume increases pressure. Use 10cc increments to fine-tune.
Final Thought
Suspension tuning is part science, part feel. If you’ve gone through this checklist and still feel your bike isn’t performing at its best, it may be time for a custom re-valve. At Click Suspension, we specialize in dialing in personalized suspension solutions for motocross, enduro, trail, and mountain bike riders.
I hope this has helped you gain some suspension knowledge and if you can retain and practice adjusting your suspension clickers you will be far ahead of your competition!
Cheers and good luck racing !
Neezer and Family at Click Suspension
Copyright © 2018 Click Suspension Labs all rights reserved. Click Suspension Labs,Click Suspension and Liquid A kit are trademarks of Click Suspension Labs.