SUSPENSION TUNING GUIDE
Number 1… The all important Sag measurement !
Why create a sag video when you can see it on youtube by Rocky Mountain, Good job guys!
Sag percent general rule of thumb:
Front suspension static sag should be 14% ( available travel in mm X .14 = static sag in mm )
Front suspension rider sag should be 25% ( available travel in mm X .25 = Rider sag in mm )
Rear suspension static sag should be 11% ( available travel in mm X .11 = static sag in mm )
Rear suspension rider sag should be 34% ( available travel in mm X .34 = rider sag in mm )
General rule of thumb rear suspension sag chart:
Note: Always refer to your owners manual for your specific bike the table listed below is a rule of thumb starting point…. again your bike manufacture may have a different specification !!!
SAG TERMS
SAG : The original meaning behind the acronym SAG “Support And Gear”
Extended SAG refers to the measurement of suspension at full extension i.e. wheel off the ground / no weight compressing the suspension.
Static SAG refers to the amount the vehicle settles with no rider. This settling is about 6% – 10% of the total suspension travel.
Race SAG is the amount the bike droops with the rider on the bike. Rear suspension SAG is approximately 30% – 33%, the front SAG is around 25% – 30% of the total suspension travel.
TUNING FOR TRACK CONDITIONS
Before You Adjust Your Suspension Clickers double check the following
You should have a note book to keep track of your all your testing.
- Check where your clickers are set and take note.
- Adjust tire pressure for your type of riding and terrain.
- Make sure you have the correct spring rate on your bike and set your sag.
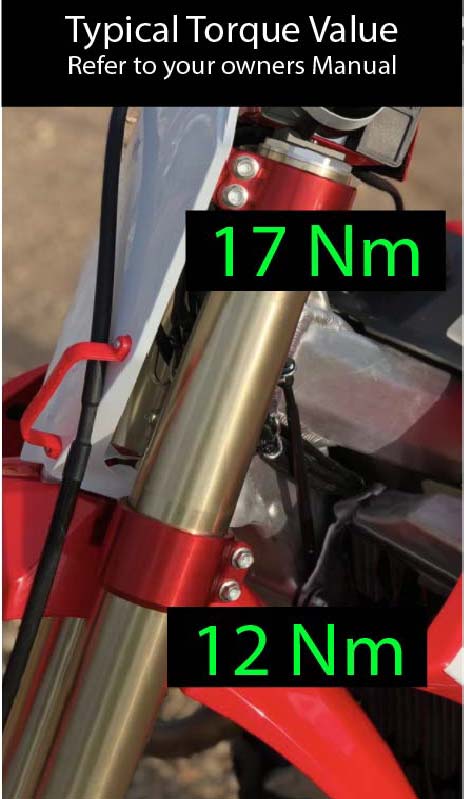
- Make sure the front wheel is Installed correctly. “Torque your triple clamps to the factory suggested specification. If triple clamp bolts are too tight the inner fork tubes can bind”. Typical torque for MX triple clamps bolts is 12Nm (106 inch/lb) for lower bolts and 17Nm 150 inch/lb) for the upper bolts ( refer to your owners manual when possible).
- Release the air out of the fork every time you ride using the air bleed screw or the aftermarket air release buttons. Also check your air spring pressure often. NOTE: even WP AER suspension forks have air release screws that require air release often.
- Maintain your suspension and your bike. Follow guide lines in your owners manual for suspension service intervals.
How To Adjust Suspension Clickers
Start off by riding your bike with your clickers set in the standard position (refer to your owner’s manual). This will give you a good base line setting of how your bike handles.
You’ll need to adjust your rebound and compression damping according to your riding needs. The first step you need to make before tuning your suspension is checking your owner’s manual. The owner’s manual will provide suggested settings, and it will inform you on how to click adjust rebound and compression for your fork and shock.
CLICKER ADJUSTER TIP: To learn what clicker adjustments can do for your suspension feel, experiment with the compression adjustments and rebound adjustments. We suggest you start with compression damping first. Turn the compression adjuster to full firm on your fork, ride your bike safely ( not at race pace please ) for a few laps, and then turn the adjuster to full soft. This adjustment will give you an idea what compression damping can do. Repeat clicker testing on rear shock. Likewise, do the same with your rebound adjuster on fork and repeat test on rear shock. This helps you get a feel for the damping adjustment bracket range. This is really the best way for you to get familiar with your suspension clicker range of adjustment.
Your bike’s suspension is made up of two components that work in conjunction with one another. At the front you have the fork, whether it be upside down (USD) or right-side up depends on the make and model of your bike. At the back is the shock. You can usually control the amount of compression and rebound to suit your needs via the clicker adjustments………now you know why my suspension company is called CLICK !
Most of the high performance rear shocks come with low-speed and high-speed compression adjusters. The low-speed adjuster controls the damping at low shock speed velocities like rolling bumps, whoops, and jump faces. The high-speed adjuster controls damping when the shock is moving at higher speeds like square-edged bumps.
You can adjust your suspension damping for an individual rider’s weight, comfort, and riding terrain. Making the right changes with your clickers will make your bike handle better and give you a better riding experience and build your racing confidence.
Soft terrain usually requires more compression damping. The bumps are bigger and spaced farther apart so they require more rebound damping to minimize kick. On hard packed dirt the bumps will usually be closer together and square edges will develop and a softer setting usually offers a better setting for comfort and traction. Yes on some tracks you might have a mixture of both dirt types… so the best setting may end up as a blending of these tuning suggestions. On muddy days your bike will take on huge amounts of extra weight….. GO UP ON SPRING RATES AND COMPRESSION DAMPING…. the factory guys do!
Suspension Symptoms:
Head Shake:
Head shake is the sensation of the handlebars swapping back and forth violently and feels like the handle bars are going to rip out of you hands. Head shake is a common thing racers have to deal with. Here are some idea’s to help reduce head shake. Determine what is causing the head shake by following the trouble shooting process listed here.
#1 Check your steering bearings. How tight are they? Put your bike on a stand with the front wheel in the air. Turn the bars to the left (halfway to the triple-clamp stop) and let go of them. If the bars fall on their own and it hits the stop enough to bounce back, your steering bearings are way too loose. Your bars should require a little push for them to fall to the stop—and they should just hit it and not bounce back. That is the loosest you should ever keep them. some riders especially in Super Cross like their steering head bearings extremely tight ( this helps keep bike straight in whoops). Tip: When tightening the steering head bearings, loosen the bottom triple-clamp bolts instead of the top ones. This will keep your fork height the same, and the bottom clamp will pull up as you are tightening the spanner nut, giving you the same results.
#2 If steering head bearings is not the cause of your head shake, then you need to look at how balanced your suspension setup is. Unbalanced suspension can induce head shake. The next question to ask yourself is, do I experience head shake when accelerating or when braking? When you are on the gas, the front end is light. If the forks are too stiff or the rebound is too slow, the front wheel won’t be able to follow the ground. In this case, the wheel will skip off the bumps and then start dancing around.
#3 If the front forks aren’t the problem, then the rear suspension could be too low or too soft, and the chassis might deep down too much, making the front end nervous”swap side to side”. The symptom is most obvious when turning through bumps. The solution is to raise the rear of the bike by changing the race sag to a higher number.
#4 if you are off the gas and on the brakes when head shake occurs, then your front forks are diving too far. When this happens, the spring force / progressive curve due to oil height inside your forks ramps up. The combination of a steep head angle (caused by the dive) and stiffer mid-stroke spring force can start the front end dancing.
Reducing head shake can take some time….. Just go through the 4 steps above to resolve it. Think through the symptoms and make the proper adjustments.
Steering Symptoms:
Oversteer: Oversteer is what occurs when a bike turns by more than the amount of input by the rider. To correct you can try more compression, more rear end sag or more preload/stiffer fork springs.
Understeer: Understeer is what occurs when a bike steers less than the amount input by the driver. To correct you can try less compression on fork setting, less preload on fork springs or less rear end sag.
Fork Dive: If the fork is diving too much under braking you can try a few things. More compression, more fork spring pre-load, stiffer fork springs Or take some of the rider weight transfer off the front end during braking by lowering the back end sag. Some times you can push fork legs lower in triple clamps to raise the front end up a little ( again this transfers weight of rider to the back of the bike), however this will slow steering and may cause front end to push “understeer”.
Rear shock is kicking:
A common complaint regarding the shock has to do with kicking, especially under braking. Having a controlled rear end when entering corners will do wonders for confidence. So, if you feel the shock kicks or lifts under braking, there are a few things you can try.
Sag First
First and foremost, you should start with your rider sag. To explain, if the sag is too tall, it not only starts a little higher in the stroke, but it will also put extra weight on the front end. This can cause the forks to dive further into their stroke. The result is a compounded issue as the rear of the bike rides high, while the front-end dives lower under braking. This is NO GOOD when it comes to confidence while when braking hard.
So, if it feels like a ride-height (sag) issue, take some preload off the shock spring. This will lower the rear of the bike and take a little weight off of the front end. The ideal outcome is a bike that feels balanced, not stink-bugged or chopper’d.
Another factor could be the spring rate of your shock spring. If the shock spring is too stiff, especially through the first few inches of travel, it won’t absorb under braking. This can consequently lead to a shock that lifts, especially when unweighted. However, if your bike feels well balanced on the track and your shock spring is in the ballpark for your weight, but you’re still experiencing some kicking, it could be time to play with the forks.
The Forks May Be Too Soft
If you’ve determined that your rider sag feels comfortable, the next place to go is the forks. No matter how dialed your shock is, if your forks are diving too much, the rear end is likely to kick under braking. This issue is exponentially increased the harder you brake and the bigger the bumps get. For example, a motocross pro will need a much firmer front end than a novice rider. The size of the bumps and/or the harder braking adds greater pressure to the forks, causing them to dive further into the stroke. And any time the forks dive, the rear end will consequentially kick.
There are a few ways to firm up the forks. First, and the simplest place to start, is to go in on the compression clicker. The result makes the forks slightly firmer, which will keep them up a little more under braking. Try a click or two at a time to see if this helps the forks stay up, and the rear end settled as a result.
Another adjustment to try is to go out on (softening) the rebound on the forks. This can help the front end recover better under braking, although it may not have quite as big an impact in keeping the forks up.
It May Be Shock Rebound
Oftentimes we hear riders say the shock was kicking so they immediately cranked in on the shock rebound. While slowing (stiffening) the rebound may help, it can also backfire. For instance, if the shock rebound gets to be too slow, at a certain point the shock will begin to pack. What packing means, in suspension terminology, is that the suspension moves lower and lower through the stroke over subsequent bumps, as the rebound is too slow to let the shock extend back “recover from bump to bump”. As a result, the shock may feel ok over the first bump, but then it all of the sudden starts the rear end kicks up because it can’t move and recover fast enough. Even worse, if you then hit a taller bump in the sequence, it can cause a wicked kick.
In short, playing with the shock rebound is a tricky one. It can help the shock settle more under braking. However, if you go too far, it can actually further upset the rear end. You won’t really know until you make some adjustments and try it, but be sure to keep a record of how the changes affected the handling.
Also, of importance is to try to determine when the kick is happening. In more detail, is the shock absorbing the bump, then kicking off of the bump? This would be more of a rebound issue. But if the shock just feels like it doesn’t really absorb the bumps, the rebound won’t really help. In that case you want to soften compression damping a little more.
The High-Speed Compression Damping Can Help
Another adjustment to try is the high-speed compression damping on the shock. The high-speed most affects the movement of the shock over braking or hard square edge bumps. So, if the shock is kicking under braking and not absorbing the bumps, softening (going out on) the high-speed adjuster may help it move and absorb a little more. We recommend trying 1/8 and 1/4 turns at a time to test the difference.
Alternatively, if the kicking (or lifting) is occurring over rolling, slower-travel movements, going out on (softening) the low-speed clicker may help. To be specific, this might help if the shock feels too firm in a set of rolling whoops, or a g-out type of hit. If the shock feels like it doesn’t absorb the rolling hit enough—it firms up too quickly—and lifts as a result, then softening the low-speed can help it move a little further into the stroke. We suggest a click or two at a time.
The Cause You May Not Want to Hear
Lastly, there is one more adjustment that can make a difference if the rear end is lifting under braking: No matter how stiff the forks, or how soft/flat the shock rides, if you’re aggressively braking without getting your weight (butt) over the rear of the bike, the forks are going to dive, and the rear shock is bound to kick. Adjusting the suspension settings to match your style can definitely help. However, there is a limit. Ultimately, the input you give as a rider makes the most difference. So, while this is by no means meant as a critique, be honest with your expectations based on the input you’re giving your bike.
A shock that kicks under braking can have numerous causes. Use the adjustments listed here as a reference for things to try to address the issue. Check each adjustment off the list, being sure to keep a record of any changes you make. Also, make sure to correct an adjustment that didn’t work; i.e. going back out on the shock rebound if going in made it worse. More than likely, one of the tips listed will help. However, if the kicking or lifting persists, it may need to be addressed internally by re-valving the shock.
Hard Pack / Square Edge Bump Conditions:
Adjust compression damping as soft as possible, to handle square edges while still having some control with bottoming and G-outs on jump faces.
Loamy Conditions:
Adjust damping a little firmer for loamy terrain, jump faces and bottoming.
Sandy Conditions:
Adjust damping towards the firmer side increase your fork compression and increase your shocks rebound. In general, two (2) clicks each. You want the bike to ride on top of the terrain, allowing the forks to ride up a little higher.
Rocks / Roots Conditions:
Adjust compression more towards the soft side; this helps to absorb the small sharp hits. You can also speed up rebound both front and rear; this adjustment helps wheels react quickly from rock to rock. Compression on the softer side will also produce a very soft plush feel and help reduce arm pump/fatigue. This type of setting is good for woods or trail riding; however it will not usually firm enough for fast MX track conditions; the bike will have a feeling “bouncy”. Some riders explain this feel as too busy and complain of bottom out issues in whoops and jumps.
Front End does not settle in turns, Feels Harsh, Poor Traction While Making Flat Turns:
Some causes can be spring rate is too high or compression damping is set too firm. Try reducing compression damping. You may consider softer coil spring rates and with air spring systems reduce air pressure.
Bottoms out, To Soft Throughout Travel:
Causes spring rate or air pressure too low or too little compression damping Increase compression damping; Stiffer Coils Springs or more air pressure. Also consider increasing oil level in forks to make spring rate more progressive. NOTE: Many MTB suspension systems use air volume spacers to make the spring curve more progressive.
Excessive Sag, Feels Soft Initially:
Causes spring rate to low or Initial preload to low Increase spring preload or add more air pressure to air spring type systems.
Harsh Over Small Bumps But Uses Full Travel:
Causes Initial spring rate or preload too high, too much low speed compression damping Install softer springs, reduce air pressure and also test with reduced compression damping.
Takes First Few Bumps In A Series Of Bumps Well, But Harsh Over the Following Bumps, Poor Traction In Corners:
Causes It maybe that you have too much rebound damping. Try reducing rebound damping.
Too Much Compression:
The suspension feel with will be harsh. As shock shaft or fork movement speed increases so does harshness. Rear end and the fork will want to deflect when hitting medium to large bumps (shock resist movement even on medium size bumps) Decrease compression until harshness is gone.
Wheel Chatters Over Small Bumps During Braking Or Downhills:
Causes too much preload on spring or spring rate is too high , causing the suspension to top out. It’s also possible you may have too much compression damping and or rebound being too slow can also cause issues with chatter and small bump feed back.
Front-Forks Spring Back Too Quickly After Bumps, Poor Traction In Bumpy Corners:
Causes not enough rebound damping Increase rebound damping.
Not Using Full Travel, Feels Harsh, Poor Cornering and Braking Traction:
Causes: An overly stiff spring rate or too much compression damping; possibly too much preload. Also try to speed up rebound a little this can also help with traction issues.
Rear Shock Lack Of Compression:
The rear suspension is soft and will just blow through the travel too easy and on jump faces or landings, the shock bottoms too easily. Increase the compression “gradually until the compression feel is optimized. You will notice better control, and the wallow symptoms will go away.
Fork Oil Height Adjustment:
Adding oil to a forks main spring chamber (not the damper unit) reduces the volume of space available for air in the forks spring chamber. It is commonly overlooked, however, your coil spring forks also rely on an air spring function. Understanding this air spring function can be a huge tuning advantage. The science behind this concept is called Boyle’s law.
During compression there is a decrease in the airspace, thus causing an increase in chamber pressure. Each time the volume decreases by half, the pressure doubles.Therefor adding oil, will make the forks feel more progressive (stiffer) from mid-stroke on. Logically, if adding oil makes your forks feel stiffer, taking oil out of your forks will make them softer. You can remove 10cc of oil from each fork leg whenever a fork feels harsh in the middle—and keep reducing the oil volume by 10cc until you have a bottoming out issue.
Glossary Of Terms
Spring Rates:
The spring rate and preload will set the ride height and determines how much of the total travel will be available for compression and how much will be available for droop travel.
Spring Preload:
The amount of tension that is applied to the spring from its full extended before installation length. This adjustment is very important for proper suspension action.
Coil Spring:
Consists of a metal wire formed into a coil which can store energy when compressed, and releases energy as the load is relieved.
Air Spring:
Air being compressed in a sealed telescopic system which can store energy when compressed, and releases energy as the load is relieved.
Damping:
A hydraulic shock absorber controls unwanted spring motion through a process known as damping. Shock absorbers slow down and reduce the magnitude of track bump input motions by turning the kinetic energy of suspension movement into heat energy that can be dissipated through hydraulic fluid that thermo transfers through the shock body.
Compression damping controls the shock or fork when it is being compressed.
Rebound damping controls the shock or fork when it is extending back to the starting point of wheel travel.
Compression Damping:
The compression damping absorbs wheel input energy on the compression stroke.
Rebound Damping:
The rebound damping absorbs (slows) wheel extension energy as the wheel returns from the compression stroke
Damper:
A oil fluid chamber that regulates the oil flow and controls the speed of the moving hydraulic piston during compression or rebound strokes.
Damper Speed:
The speed in which the moving end of a damper compresses or rebounds.
Damping Circuits:
There is both a low and high-speed circuit for the compression and rebound strokes.
HSC / High-Speed Compression:
High-Speed Compression damping is the damping circuit in the shock absorber or suspension fork that is tuned to provide suspension travel control at high speed over square-edged bumps. Too low of HSC damping will cause excessive bottoming out in rough terrain. Too high of HSC damping will minimize suspension travel in rough terrain and cause loss of traction and tire deflection and a very harsh ride.
LSC / Low Speed Compression:
Low-Speed Compression damping is the damping circuit in the shock absorber or suspension fork that is tuned to provide suspension travel control at low damper speed conditions. Too little of LSC damping will cause the excessive travel use, brake dive and wallowing on small bump terrain. Too much of LSC damping will cause loss of traction on small bump terrain and harsh feel.
Suspension Packing:
A term used to describe the ride characteristics of a rear shock or fork that has too slow of a rebound setting. A rear shock or fork that has too much rebound setting will stay compressed after hitting one bump and cannot rebound quickly enough to reset for consecutive bumps. The solution is to adjust the rebound to a faster setting.
Preload:
Preload is applied to the fork and shock springs in order to bring the bike to the proper SAG dimension. Adjusting preload to the proper SAG dimension ensures traction as wheel load gets light and drops into bumpy holed sections of terrain.
Valve Shim:
A thin, spring steel flat washer used to exert resistance on the oil flow through the damper piston. A series of valve shims (valve stack or valving) with varying outer diameters and thicknesses are arranged in sequence to provide a particular damping force effect.
Spring Rate:
Spring rates can be described as pounds “LBS.” , kilograms “KG” or Newton Meter “NM”. YOUR ALMOST DONE WITH TODAYS SUSPENSION CLASS…………
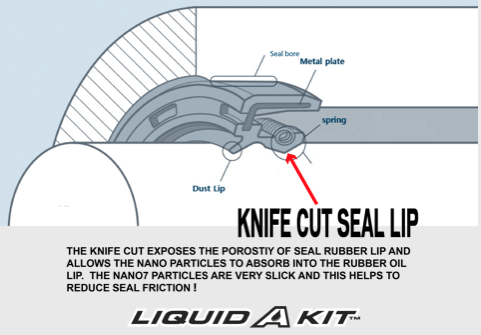
Stiction Is Friction:
Stiction is the combination of the words static and friction. This word is used to describe the tension exerted on the moving parts by the stationary parts like the bushings, seals, and wipers. Low stiction is more desirable because it allows the moving parts to slide better and over time the moving parts will have less wear on them.
Unsprung weight vs Sprung weight:
The difference between sprung and unsprung
To understand the difference, imagine a motorcycle moving forward until the front wheel hits a bump large enough to move that wheel upward towards the frames down tube. But as the wheel moves up, the motorcycle frame might not move much or at all, because it’s isolated from the upward-moving wheel by fork springs; the springs can compress to allow the frame of the motorcycle to stay where it is as the wheel moves up and down underneath it. That’s the difference: the frame of the motorcycle and everything attached solidly to it is sprung, meaning that it’s isolated from the wheels by compressible springs; the tires, wheels, and anything attached directly to them are unsprung, meaning that the springs don’t keep them from having to move when the motorcycle comes to a rise or fall in the track.
Almost all of the motorcycle is sprung weight, because almost every part of it is attached solidly to the frame. Besides the frame itself that includes all other structural or sub-frame components, the engine and transmission and of course the rider.
What about unsprung weight? The following are unsprung:
- Tires
- Wheels
- Wheel bearings and hubs (the parts the wheels rotate on)
- Brake assemblies
- Swing arm and lower fork inner tube “sliders”.
Semi-Sprung Parts:
Parts like this that have to move when the wheel does, but not as far, are said to be partly sprung, semi-sprung, or hybrid weight. Typical semi-sprung parts include:
- The springs themselves
- Shock absorbers and forks
Why does any of this matter? If a large part of a motorcycles mass is unsprung, it’s more difficult to keep the tires planted firmly on the road as it rides over bumps because the springs have to apply more force to move them. Having a high ratio of sprung to unsprung weight is therefore always desirable, and is particularly important for vehicles that are intended to handle well at high speeds. Racing teams thus reduce unsprung weight by, for example, using lightweight wheel sets, and race team engineers try to design suspension components with as little unsprung weight as possible.
Note that unsprung weight or mass is sometimes confused with rotating mass because some parts (tires, wheels, most brake discs) fall into both categories and because racers want to reduce them both. But they’re not the same thing. Rotating mass is what it sounds like, anything that has to rotate when the motorcycle goes forward. Lower unsprung weight improves handling and sometimes traction, while lowering rotating weight improves acceleration.
I hope this has helped you gain some suspension knowledge and if you can retain and practice adjusting your suspension clickers you will be far ahead of your competition!
Cheers and good luck racing !
Neezer and Family at Click Suspension
Copyright © 2018 Click Suspension Labs all rights reserved. Click Suspension Labs,Click Suspension and Liquid A kit are trademarks of Click Suspension Labs.